Web模拟器:RISC-V Interpreter
项目源代码:Invisiphantom/RISC-V-SIngle-Cycle
项目环境配置:IVerilog+VSCode环境配置 | Mind City
项目代码解析:RISC-V单周期CPU设计 | Mind City
- 相关项目
- Y86-64单周期CPU:Y86-64单周期CPU设计 | Mind City
- RISC-V流水线CPU:Invisiphantom/RISC-V-Pipeline
安装RISCV-32工具链
由于binutils-riscv32-linux-gnu和gcc-riscv32-linux-gnu无法直接通过apt安装
所以需要手动从Github下载工具链并添加到环境变量
从riscv-gnu-toolchain下载编译好的工具链
Releases · riscv-gnu-toolchain
解压后将其移动至/opt/riscv文件夹
1 | sudo mv riscv /opt/riscv |
将/opt/riscv/bin添加到~/.bashrc中的环境变量
打开~/.bashrc并在末尾行添加
1 | export PATH=/opt/riscv/bin:$PATH |
测试工具链是否安装成功
查看riscv32-unknown-linux-gnu-gcc的版本信息
1 | $ riscv32-unknown-linux-gnu-gcc --version |
新建demo.c文件
1 |
|
使用riscv32-unknown-linux-gnu-gcc进行编译
1 | $ riscv32-unknown-linux-gnu-gcc demo.c -o demo |
使用qemu-riscv32运行生成的可执行文件
1 | $ qemu-riscv32 demo |
配置VSCode的IntelliSense和Code-Runner
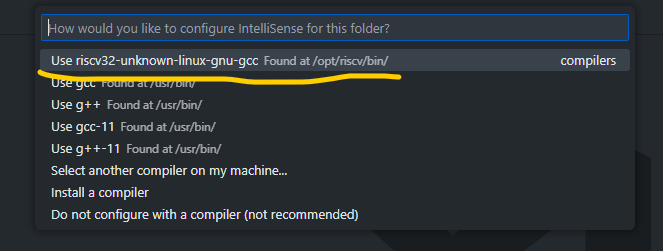
打开VSCode的命令面板并选择riscv32-unknown-linux-gnu-gcc
1 | > C/C++: Select IntelliSense Configuration |

修改Code-Runner的指令匹配规则
1 | "code-runner.executorMap": { |
这样就可以通过Ctrl+Alt+N实现一键编译,反汇编和运行了
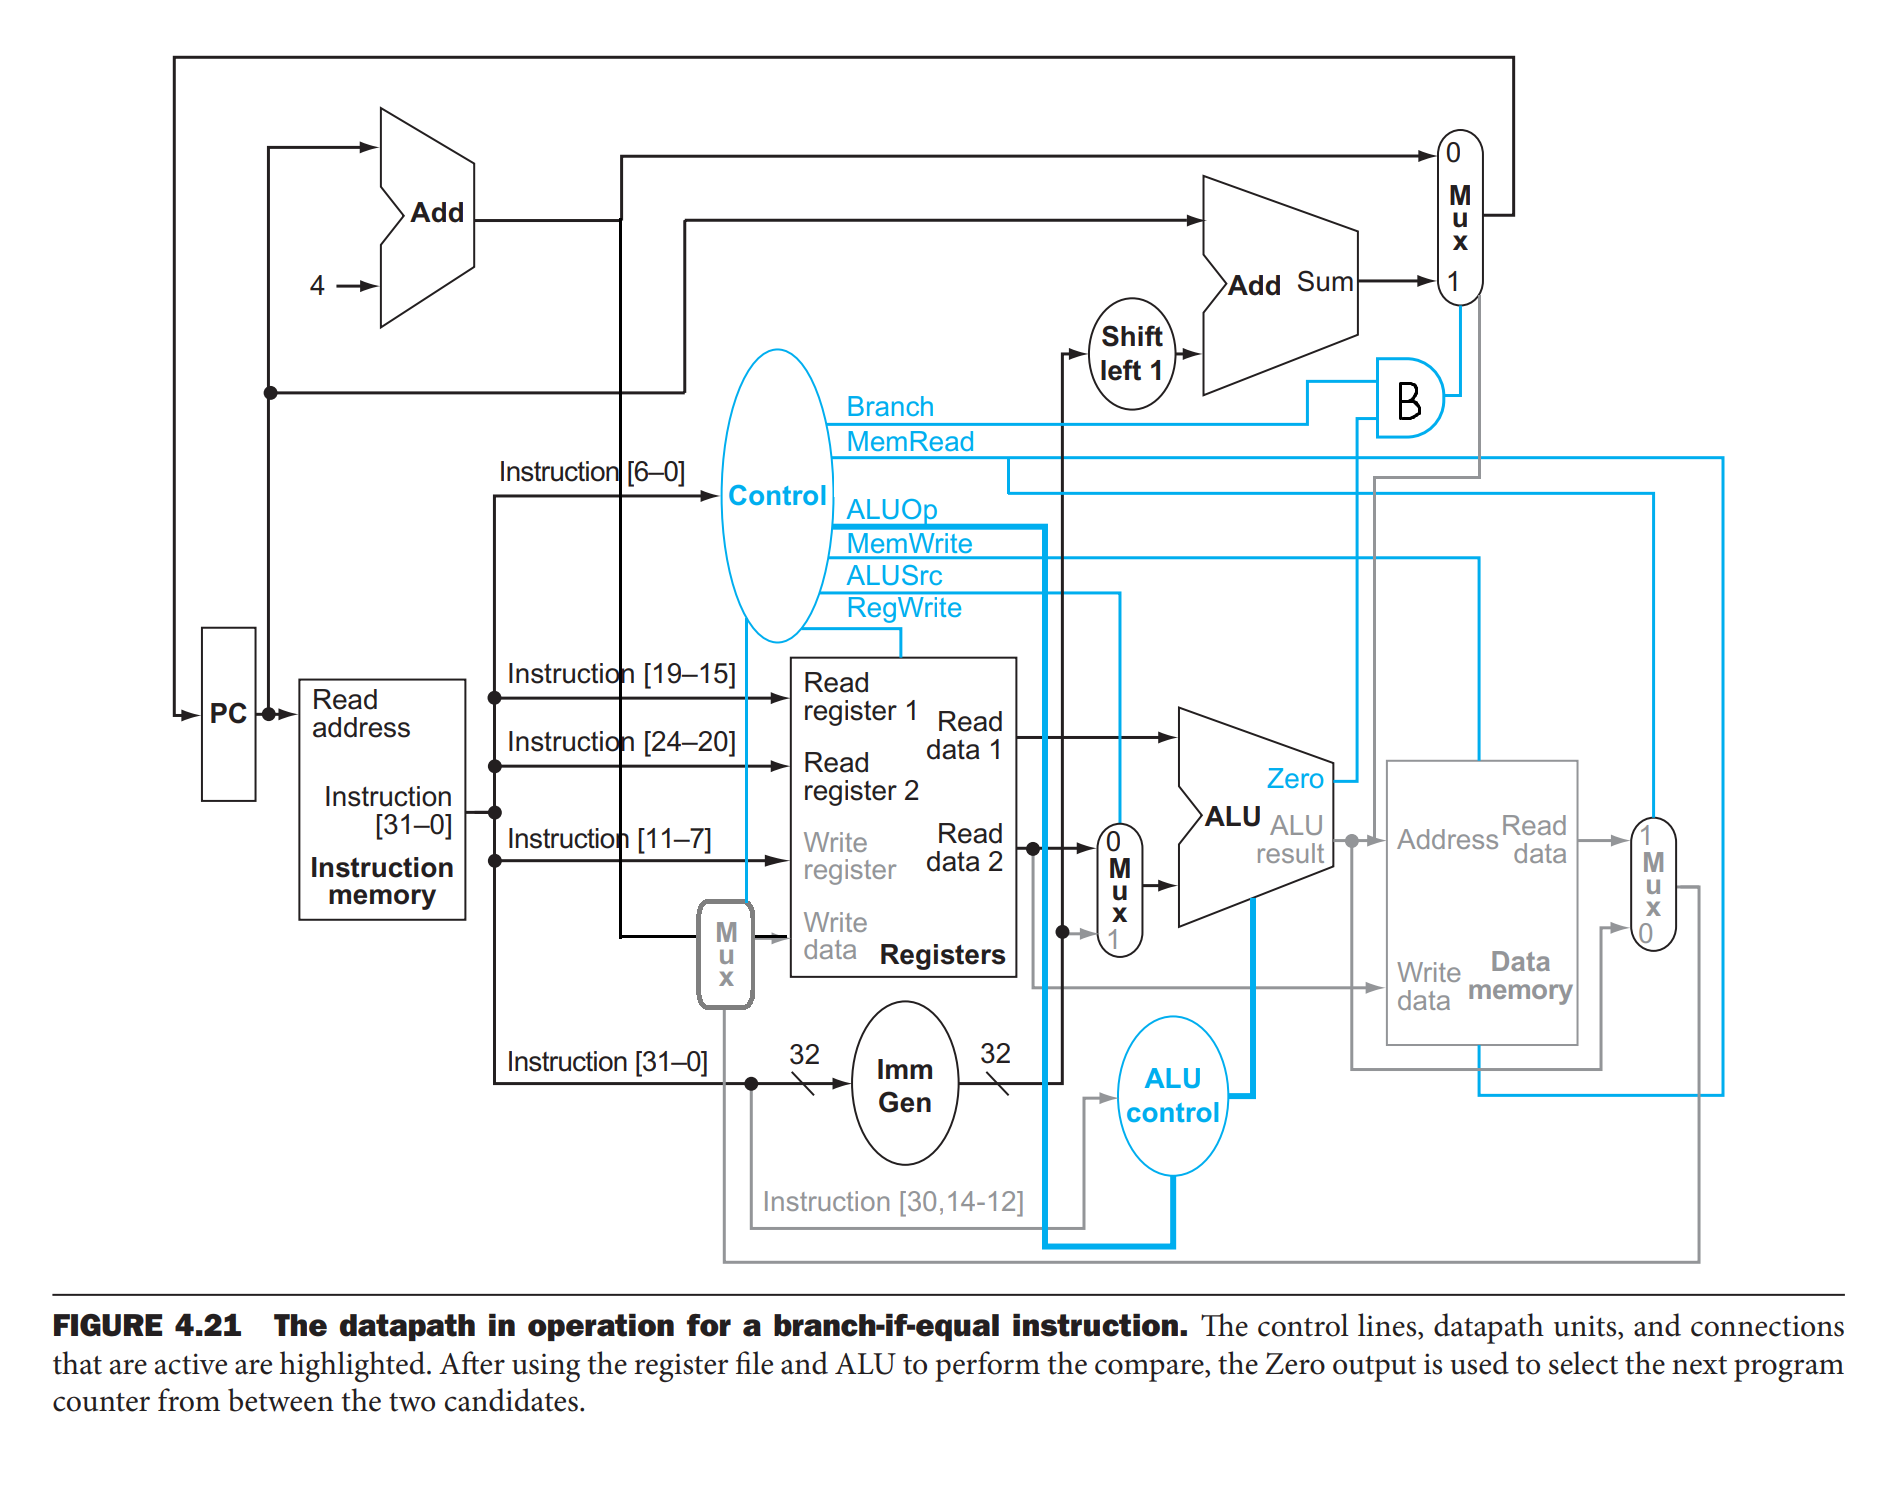
整体架构图(《cod RISC-V Edition》 P260)

- PC: 选择PCaddress的更新方式(累加or跳转)
- InstMem: 从内存中取出PCaddress地址处的指令
- Control: 将指令进行译码
- Regs: 选择需要读取的寄存器和要写入的寄存器
- ImmGen: 对立即数进行符号扩展
- ALUControl: 选择ALU需要执行的运算
- ALU: 执行运算并更新标志位
- Mem: 执行内存的读写操作
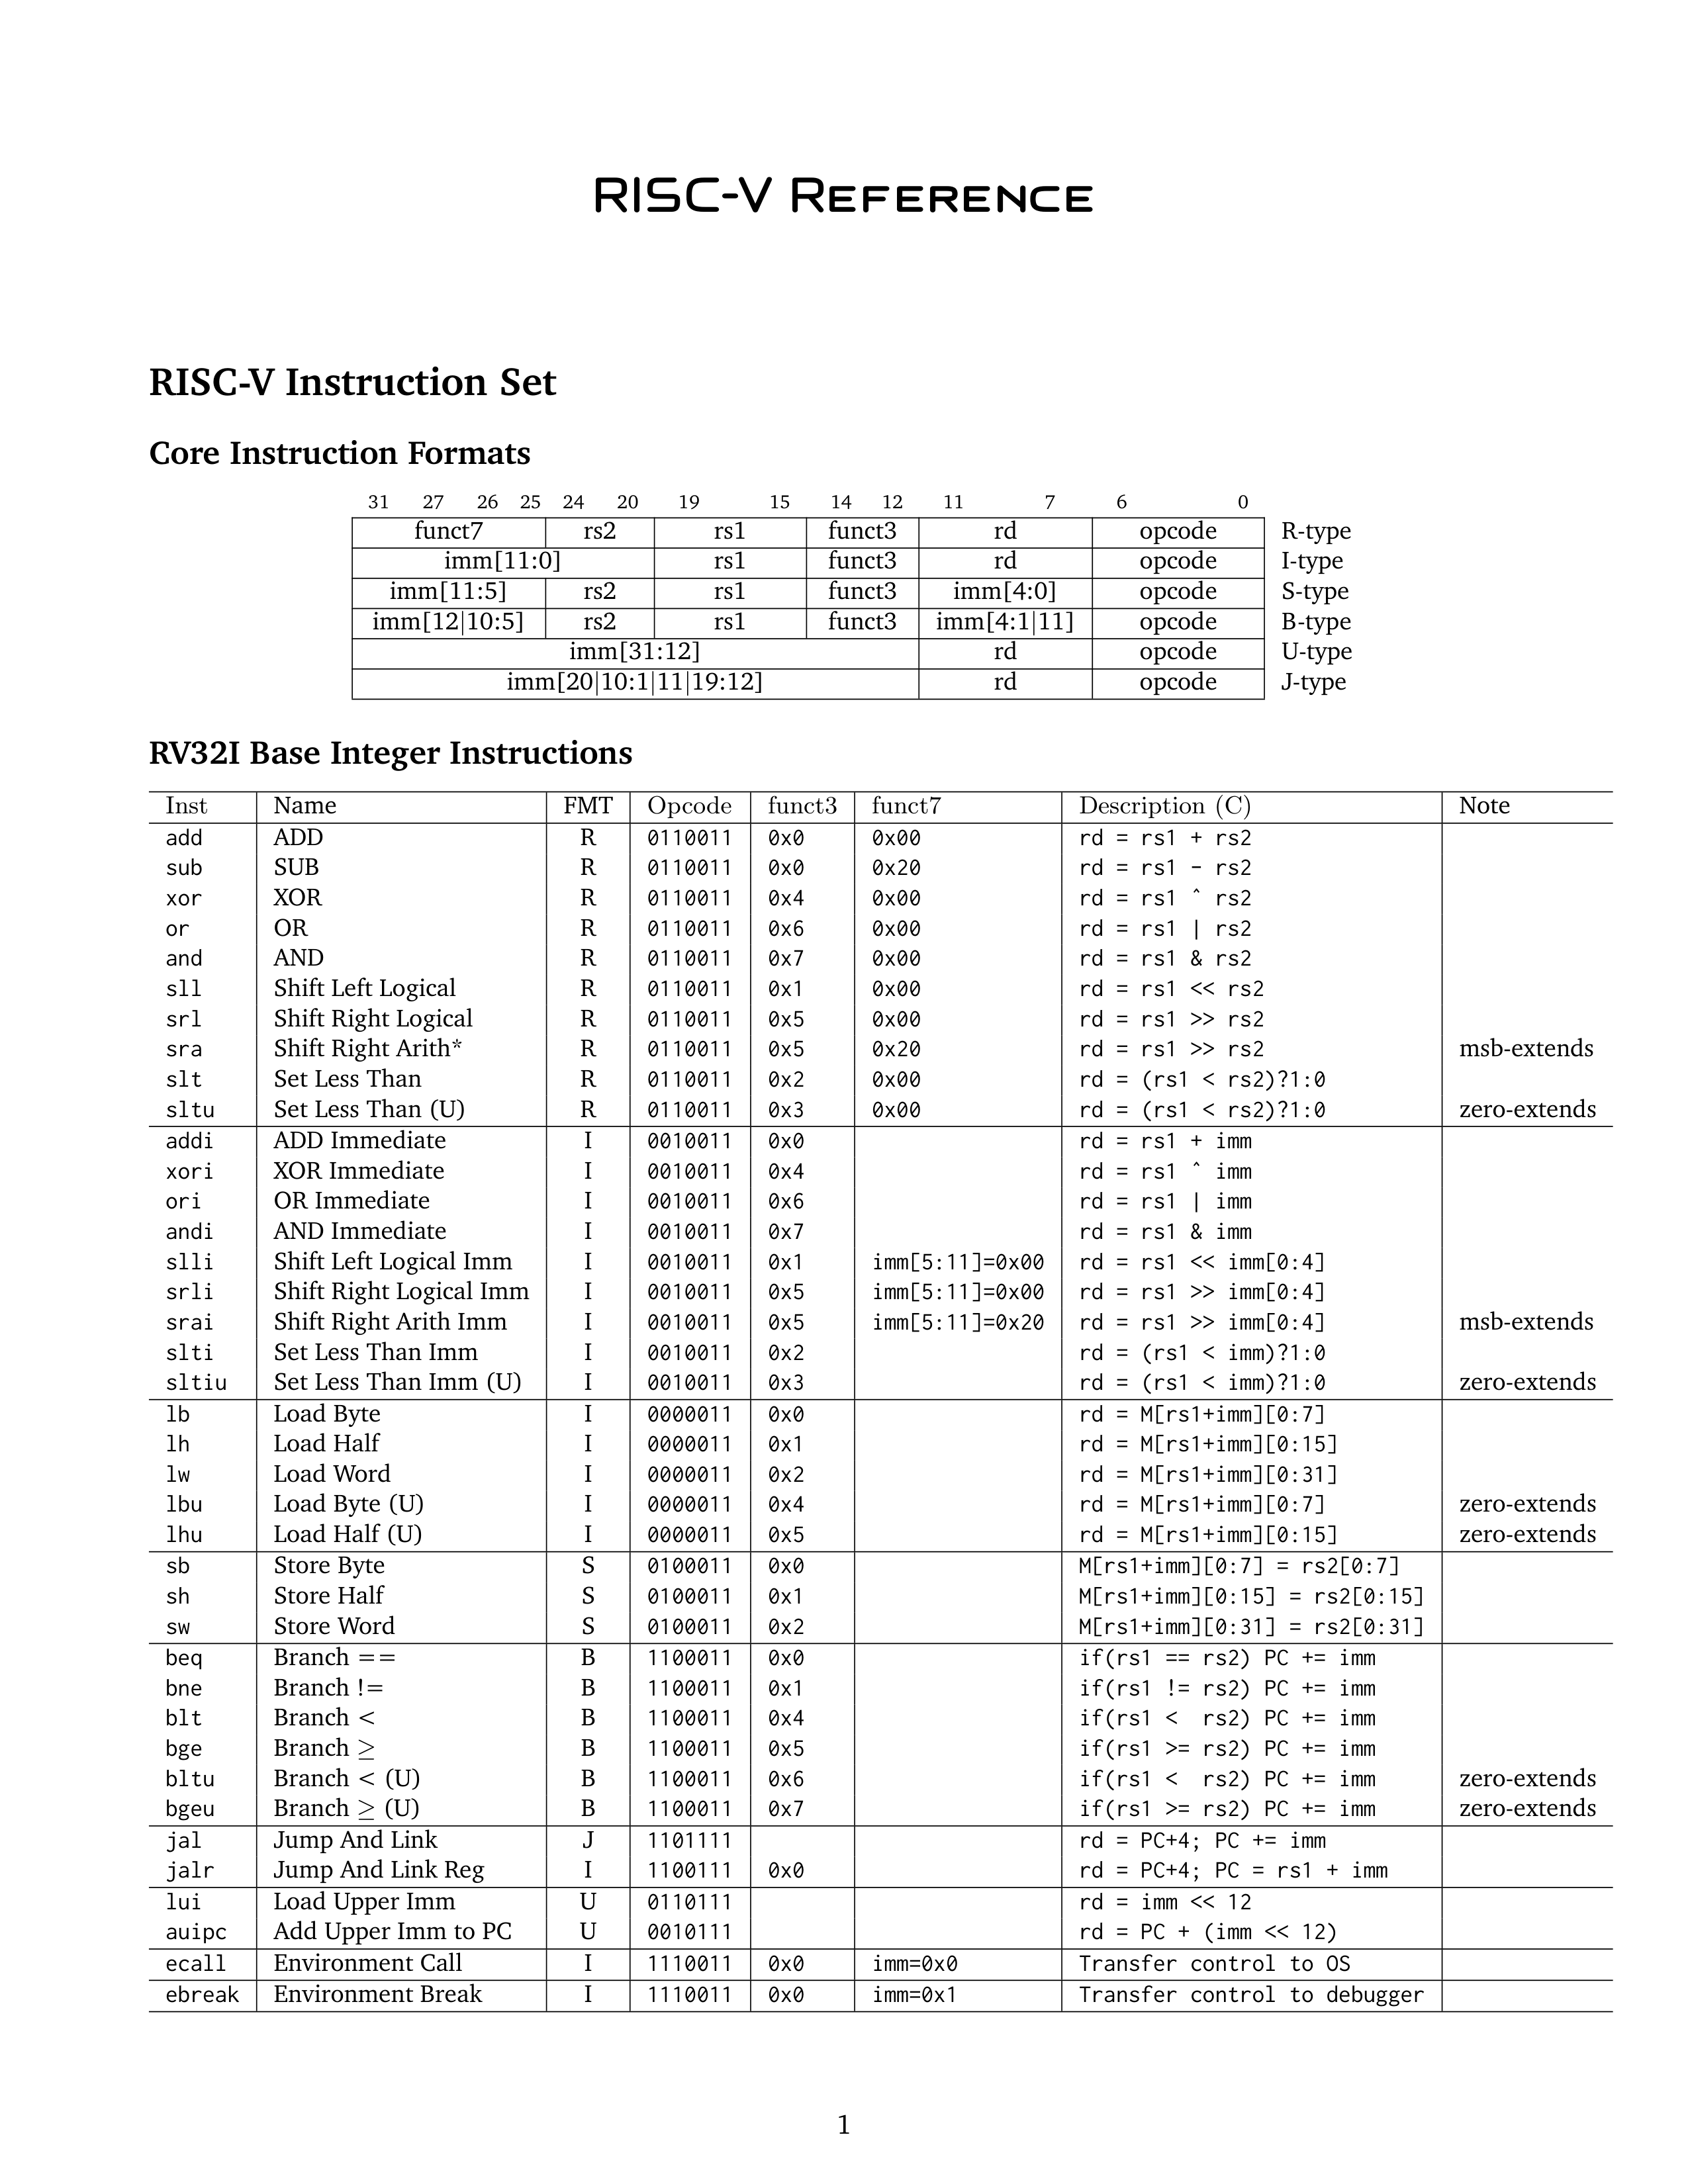
RISC-V RV32-I指令集(RISC-V Reference)

译码器Control的输出信号
1 | RegWrite 是否需要写入寄存器 |
各指令类型对应的输出信号
Uni是该类指令的专有输出信号名称(例如jalr指令对应JumpReg信号)
1 | RegWrite ALUSrc ALUOp Uni |
各指令类型需要使用ALU执行的运算
1 | R-type rd = rs1 ops rs2 |
ALU输出的三个标志位
1 | zero 两数相等 |
Verilog代码细节
PC
- 加载main函数的起始地址
- 在时钟上升沿将PCaddress更新为PCnext
1
2
3
4
5
6
7
8
9
10
11
12
13
14
15
16
17module PC (
input clk,
input [31:0] PCnext,
output reg [31:0] PCaddress
);
// 将main函数设置为指定入口函数
reg [31:0] PCinitial[0:0]; // $readmemh()要求必须是memory类型
initial begin
$readmemh("/home/ethan/RISC-V-Single-Cycle/ROM-PC.bin", PCinitial);
PCaddress = PCinitial[0];
end
always @(posedge clk) begin
PCaddress <= PCnext;
end
endmodule
PCIncre
- 将PCincre赋值为PC的下一个地址并输出
1
2
3
4
5
6
7module PCIncre(
input [31:0] PCaddress,
output [31:0] PCincre
);
// 将PCincre赋值为PC的下一个地址
assign PCincre = PCaddress + 4;
endmodule
PCNext
选择PCaddress的更新方式 (跳转or累加)
- jalr : PC = rs1 + imm
- jal :PC += imm
- Branch: PC += imm
- other : PC += 4
1 | module PCNext ( |
Control
- 译码器
Control的输出信号1
2
3
4
5
6
7
8
9
10
11
12RegWrite 是否需要写入寄存器
ALUSrc ALU的端口B数据是来自寄存器还是立即数
0-Reg 1-Imm
ALUOp ALU的控制模式
00-add 01-sub 10-R-type 11-I-type
MemRead 是否需要读取内存
MemWrite 是否需要写入内存
Branch 是否需要条件跳转
Jump 是否需要直接跳转
JumpReg 是否需要寄存器跳转
Lui 是否需要加载高位立即数
Auipc 是否需要加载高位立即数加PC - 各指令类型对应的输出信号
1
2
3
4
5
6
7
8
9
10
11
12RegWrite ALUSrc ALUOp Uni
R-type 1 0 10
I-type 1 1 11
Load 1 1 00 MemRead
Store 0 1 00 MemWrite
Branch 0 0 01 Branch
jal 1 x xx Jump
jalr 1 1 00 JumpReg
lui 1 1 00 Lui
auipc 1 1 00 Auipc - Verilog具体实现
1
2
3
4
5
6
7
8
9
10
11
12
13
14
15
16
17
18
19
20
21
22
23
24
25
26
27
28
29
30
31
32
33
34
35
36module Control (
input [6:0] Opcode,
output RegWrite,
output ALUSrc, // 0:rs2 1:imm
output [1:0] ALUOp, // 00:add 01:sub 10:R-type 11:I-type
output MemRead, // Load
output MemWrite, // Store
output Branch, // Branch
output Jump, // jal
output JumpReg, // jalr
output Lui, // lui
output Auipc, // auipc
output reg Halt // halt
);
initial Halt = 1'b0;
reg [10:0] control;
assign {RegWrite, ALUSrc, ALUOp[1:0], MemRead, MemWrite, Branch, Jump, JumpReg, Lui, Auipc} = control[10:0];
always @(*) begin
case (Opcode)
7'b0110011: control <= 11'b10_10_0000000; // R-type
7'b0010011: control <= 11'b11_11_0000000; // I-type
7'b0000011: control <= 11'b11_00_1000000; // Load
7'b0100011: control <= 11'b01_00_0100000; // Store
7'b1100011: control <= 11'b00_01_0010000; // Branch
7'b1101111: control <= 11'b1x_xx_0001000; // jal
7'b1100111: control <= 11'b11_00_0000100; // jalr
7'b0110111: control <= 11'b11_00_0000010; // lui
7'b0010111: control <= 11'b11_00_0000001; // auipc
default: begin
Halt <= 1'b1; // 遇到非法指令就停机
control <= 11'bxxxxxxxxxxx;
end
endcase
end
endmodule
Regs
- 初始化栈指针位置
- 对寄存器进行读取或写入
1
2
3
4
5
6
7
8
9
10
11
12
13
14
15
16
17
18
19
20
21
22
23
24
25
26
27
28
29
30
31
32
33
34
35
36
37
38
39
40
41
42
43
44
45
46
47
48
49
50
51
52
53
54
55
56
57
58
59
60
61
62
63
64
65
66
67
68module Regs #(
parameter STACK_ADDR = 32'h700 // 栈指针的起始地址
) (
input clk,
input RegWrite,
input [ 4:0] readReg1,
input [ 4:0] readReg2,
input [ 4:0] writeReg,
input [31:0] writeData_R,
output [31:0] readData1_R,
output [31:0] readData2_R,
output [31:0] x0,
output [31:0] ra,
output [31:0] sp,
output [31:0] gp,
output [31:0] tp,
output [31:0] t0,
output [31:0] t1,
output [31:0] t2,
output [31:0] s0,
output [31:0] s1,
output [31:0] a0,
output [31:0] a1,
output [31:0] a2,
output [31:0] a3,
output [31:0] a4,
output [31:0] a5,
output [31:0] a6,
output [31:0] a7
);
integer i;
reg [31:0] Register[0:31];
initial begin
for (i = 0; i < 32; i = i + 1) Register[i] <= {32{1'b0}};
Register[2] <= STACK_ADDR;
end
always @(posedge clk) begin
// x0寄存器不可写
if (RegWrite && (writeReg != 5'b00000)) Register[writeReg] <= writeData_R;
end
assign readData1_R = Register[readReg1];
assign readData2_R = Register[readReg2];
assign x0 = Register[0];
assign ra = Register[1];
assign sp = Register[2];
assign gp = Register[3];
assign tp = Register[4];
assign t0 = Register[5];
assign t1 = Register[6];
assign t2 = Register[7];
assign s0 = Register[8];
assign s1 = Register[9];
assign a0 = Register[10];
assign a1 = Register[11];
assign a2 = Register[12];
assign a3 = Register[13];
assign a4 = Register[14];
assign a5 = Register[15];
assign a6 = Register[16];
assign a7 = Register[17];
endmodule
ImmGen
- 对各指令类型进行立即数的符号扩展
1 | module ImmGen ( |
ALUControl
- 选择ALU需要执行的运算
1
2
3
4
5
6
7
8
9
10
11
12
13
14
15
16
17
18
19
20
21
22
23
24
25
26
27
28
29
30
31
32
33
34
35
36
37
38
39
40
41
42
43
44
45
46
47module ALUControl (
input [1:0] ALUOp,
input funct7_30,
input [2:0] funct3,
output reg [3:0] aluControl
);
always @(*) begin
case (ALUOp)
2'b00: aluControl <= 4'b0010; // add
2'b01: aluControl <= 4'b0110; // sub
2'b10: // R-type
case ({
funct7_30, funct3
})
4'b0000: aluControl <= 4'b0010; // add
4'b1000: aluControl <= 4'b0110; // sub
4'b0100: aluControl <= 4'b0111; // xor
4'b0110: aluControl <= 4'b0001; // or
4'b0111: aluControl <= 4'b0000; // and
4'b0001: aluControl <= 4'b0011; // sll
4'b0101: aluControl <= 4'b1000; // srl
4'b1101: aluControl <= 4'b1010; // sra
4'b0010: aluControl <= 4'b0100; // slt
4'b0011: aluControl <= 4'b0101; // sltu
default: aluControl <= 4'bxxxx;
endcase
2'b11: // I-type
casez ({
funct7_30, funct3
})
4'bz000: aluControl <= 4'b0010; // addi
4'bz100: aluControl <= 4'b0111; // xori
4'bz110: aluControl <= 4'b0001; // ori
4'bz111: aluControl <= 4'b0000; // andi
4'b0001: aluControl <= 4'b0011; // slli imm[0:4]
4'b0101: aluControl <= 4'b1000; // srli imm[0:4]
4'b1101: aluControl <= 4'b1010; // srai imm[0:4]
4'bz010: aluControl <= 4'b0100; // slti
4'bz011: aluControl <= 4'b0101; // sltiu
default: aluControl <= 4'bxxxx;
endcase
endcase
end
endmodule
ALU_A
- 选择ALU端口A的数据来源
1
2
3Res A B
lui rd = 0 + imm
auipc rd = PC + imm
1 | module ALU_A ( |
ALU_B
- 选择ALU端口B的数据来源
1
2
3
4
5
6
7
8
9
10
11module ALU_B(
input ALUSrc,
input [31:0] readData2_R,
input [31:0] imm,
output reg [31:0] aluB
);
always @(*) begin
if(ALUSrc == 1'b0) aluB = readData2_R; // rs2
else aluB = imm; // imm
end
endmodule
ALU
- 执行运算并更新标志位
1
2
3
4
5
6
7
8
9
10
11
12
13
14
15
16
17
18
19
20
21
22
23
24
25
26
27
28
29
30module ALU (
input [ 3:0] aluControl,
input [31:0] aluA,
input [31:0] aluB,
output reg [31:0] aluResult,
output zero,
output s_less,
output u_less
);
assign zero = (aluResult == {32{1'b0}});
assign s_less = ($signed(aluA) < $signed(aluB));
assign u_less = (aluA < aluB);
always @(*) begin
case (aluControl)
4'b0010: aluResult <= aluA + aluB; // add
4'b0110: aluResult <= aluA - aluB; // sub
4'b0111: aluResult <= aluA ^ aluB; // xor
4'b0001: aluResult <= aluA | aluB; // or
4'b0000: aluResult <= aluA & aluB; // and
4'b0011: aluResult <= aluA << aluB[4:0]; // sll imm[0:4]
4'b1000: aluResult <= aluA >> aluB[4:0]; // srl imm[0:4]
4'b1010: aluResult <= aluA >>> aluB[4:0]; // sra imm[0:4]
4'b0100: aluResult <= s_less; // slt
4'b0101: aluResult <= u_less; // sltu
default: aluResult <= {32{1'bx}};
endcase
end
endmodule
Branch
- 判断条件分支是否满足跳转条件
1
2
3
4
5
6
7
8
9
10
11
12
13
14
15
16
17
18
19
20
21
22
23
24
25module Branch (
input Branch,
input zero,
input s_less,
input u_less,
input [2:0] funct3,
output reg Cnd
);
/*
beq : funct3==000 && zero==1 bne : funct3==001 && zero==0
blt : funct3==100 && s_less==1 bge : funct3==101 && s_less==0
bltu: funct3==110 && u_less==1 bgeu: funct3==111 && u_less==0
*/
always @(*) begin
if (Branch == 1'b1)
case (funct3[2:1])
2'b00: Cnd <= funct3[0] ^ zero;
2'b10: Cnd <= funct3[0] ^ s_less;
2'b11: Cnd <= funct3[0] ^ u_less;
default: Cnd <= 1'bx;
endcase
else Cnd <= 1'b0;
end
endmodule
Mem
- 执行内存的读写操作
1
2
3
4
5
6
7
8
9
10
11
12
13
14
15
16
17
18
19
20
21
22
23
24
25
26
27
28
29
30
31
32
33
34
35module Mem #(
parameter MEM_SIZE = 2048
) (
input clk,
input MemRead,
input MemWrite,
input [ 2:0] funct3,
input [31:0] memAddr,
input [31:0] writeData_M,
output reg [31:0] readData_M
);
reg [7:0] mem[0:MEM_SIZE - 1];
always @(MemRead or MemWrite or memAddr or writeData_M) begin
#1; // 消除memAddr和memData的抖动
if (MemRead == 1'b1) begin
case (funct3)
3'h0: readData_M <= {{(32 - 8) {mem[memAddr][7]}}, mem[memAddr]}; // lb
3'h1: readData_M <= {{(32 - 16) {mem[memAddr][7]}}, mem[memAddr], mem[memAddr+1]}; // lh
3'h2: readData_M <= {mem[memAddr], mem[memAddr+1], mem[memAddr+2], mem[memAddr+3]}; // lw
3'h4: readData_M <= {{(32 - 8) {1'b0}}, mem[memAddr]}; // lbu
3'h5: readData_M <= {{(32 - 16) {1'b0}}, mem[memAddr], mem[memAddr+1]}; // lhu
default: readData_M <= {32{1'bx}};
endcase
end else if (MemWrite == 1'b1) begin
case (funct3)
3'h0: mem[memAddr] <= writeData_M[7:0]; // sb
3'h1: {mem[memAddr], mem[memAddr+1]} <= writeData_M[15:0]; // sh
3'h2: {mem[memAddr], mem[memAddr+1], mem[memAddr+2], mem[memAddr+3]} <= writeData_M; // sw
default: mem[memAddr] <= {32{1'bx}};
endcase
end
end
endmodule
RegWrite
- 选择寄存器写回时的数据来源
1
2
3jal jalr : rd = PC + 4
Load : rd = Mem[]
other : rd = aluResult
1 | module RegWrite ( |
RISC-V顶层模块arch
1 | module arch #( |
使用riscv32-gcc和Python将C语言转换为机器码并实现仿真
在ROM.c中输入需要执行的C语言代码
1 | int add(int x, int y) { return x + y; } |
使用riscv32-gcc进行编译链接
-Og选项保持汇编代码较好的可读性-march=rv32id选项指定编译为RV32ID指令集-T ROM.ld选项指定链接脚本ROM.ld,使得指令地址从0x00000开始1
riscv32-unknown-linux-gnu-gcc -Og -march=rv32id ROM.c -o ROM.o -T ROM.ld
使用riscv32-objdump进行反汇编
-d选项指定反汇编-j .text选项指定只反汇编.text段-M no-aliases选项指定不使用别名(例如call会被反汇编为jal)1
riscv32-unknown-linux-gnu-objdump -d -j .text -M no-aliases ROM.o > ROM.S
使用ROMPath.py设置ROM的绝对路径
- 将InstMem.v和PC.v中$readmemh()的ROM.bin路径替换为当前目录下的绝对路径
1
2
3
4
5
6
7
8
9
10
11
12
13
14
15
16
17
18
19
20
21
22
23
24
25
26
27
28
29#!/usr/bin/python3
# 将InstMem.v和PC.v中$readmemh()的ROM.bin路径替换为当前的绝对路径
import os
import re
# 将工作目录切换至当前文件所在目录
os.chdir(os.path.dirname(os.path.abspath(__file__)))
# 替换InstMem.v中的$readmemh()路径
with open("InstMem.v", "r") as file:
content = file.read()
content = re.sub(
r'\$readmemh\(".*?ROM\.bin", inst_mem\);',
f'$readmemh("{os.getcwd()}/ROM.bin", inst_mem);',
content,
)
with open("InstMem.v", "w") as file:
file.write(content)
# 替换PC.v中的$readmemh()路径
with open("PC.v", "r") as file:
content = file.read()
content = re.sub(
r'\$readmemh\(".*?ROM-PC\.bin", PCinitial\);',
f'$readmemh("{os.getcwd()}/ROM-PC.bin", PCinitial);',
content,
)
with open("PC.v", "w") as file:
file.write(content)
使用ROM.py将反汇编文件转换为机器码
- 将ROM.S中的汇编指令转换为机器码写入ROM.bin中
- 将main函数的入口地址写入ROM-PC.bin中
1
2
3
4
5
6
7
8
9
10
11
12
13
14
15
16
17
18
19
20
21
22
23
24
25
26
27
28
29
30
31
32
33#!/usr/bin/python3
# 将ROM.S中的汇编指令转换为机器码写入ROM.bin中
# 将main函数的入口地址写入ROM-PC.bin中
import os
# 读取ROM.S文件
with open("ROM.S", "r") as f:
lines = f.readlines()
hex_main_addr = ""
with open("ROM.bin", "w") as f:
# 首先写入2048字节的00
ROM_content = ["00000000" for _ in range(int(2048 / 4))]
# 从第68行开始读取ROM.S文件
for line in lines[68:]:
add_inst = line. split(":")
if add_inst[0].endswith("<main>"):
hex_main_addr = add_inst[0].strip().split(" ")[0]
if len(add_inst) != 2 or add_inst[0].endswith(">"):
continue
hex_addr = add_inst[0].strip()
hex_inst = add_inst[1].strip().split(" ")[0]
dec_addr = int(hex_addr, 16)
# 在ROM_content中的对应地址位置覆盖写入指令
ROM_content[int(dec_addr / 4)] = hex_inst
# 将ROM_content中的指令写入ROM.bin文件中
f.write("\n".join(ROM_content))
with open("ROM-PC.bin", "w") as f:
# 将main函数的地址写入ROM-PC.bin文件中
f.write(hex_main_addr)
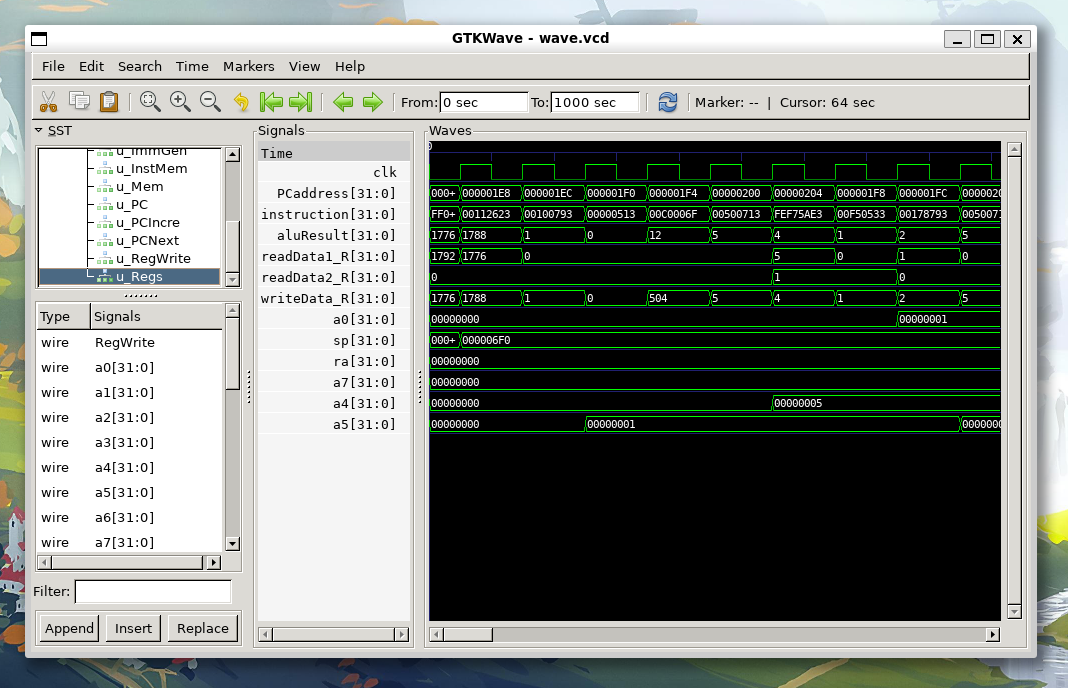
使用iverilog和GTKWave进行仿真
1 | iverilog -y $PWD arch.v -o bin/arch |

使用zcmd.sh一键执行上述所有操作
1 |
|